Introduction & Quick Start
Thank you sincerely for choosing to purchase this application and for placing your trust in us as a valued customer. This documentation has been prepared to guide you through the setup process with ease.
Requirements
This project have required following depandency:
Flutter/iOS Requirements
- Android Studio
- Flutter: 3+
File Structure
After extracting the downloaded ZIP archive you will find a directory structure similar to the following:
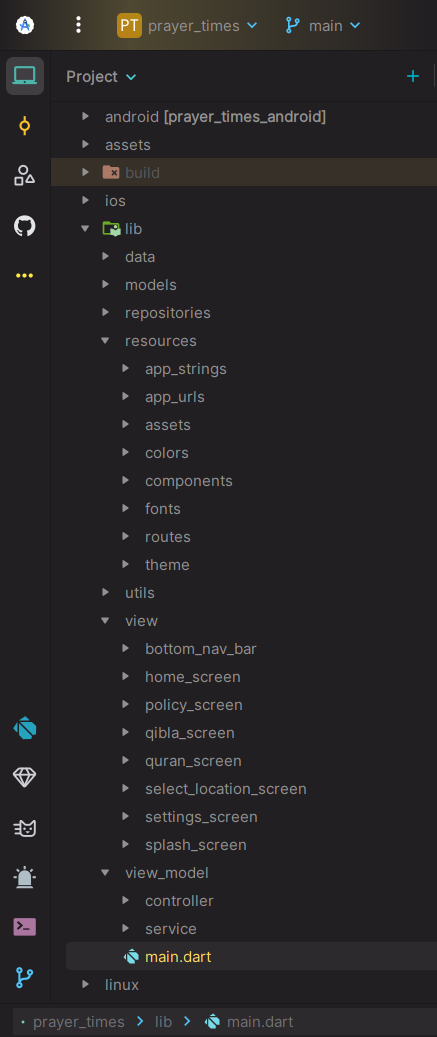
We recommend keeping this structure intact. Any custom logic should reside in proper Flutter directories (e.g., controllers or views) to make upgrades easier.
Installation & More
Follow these steps to install this flutter app:
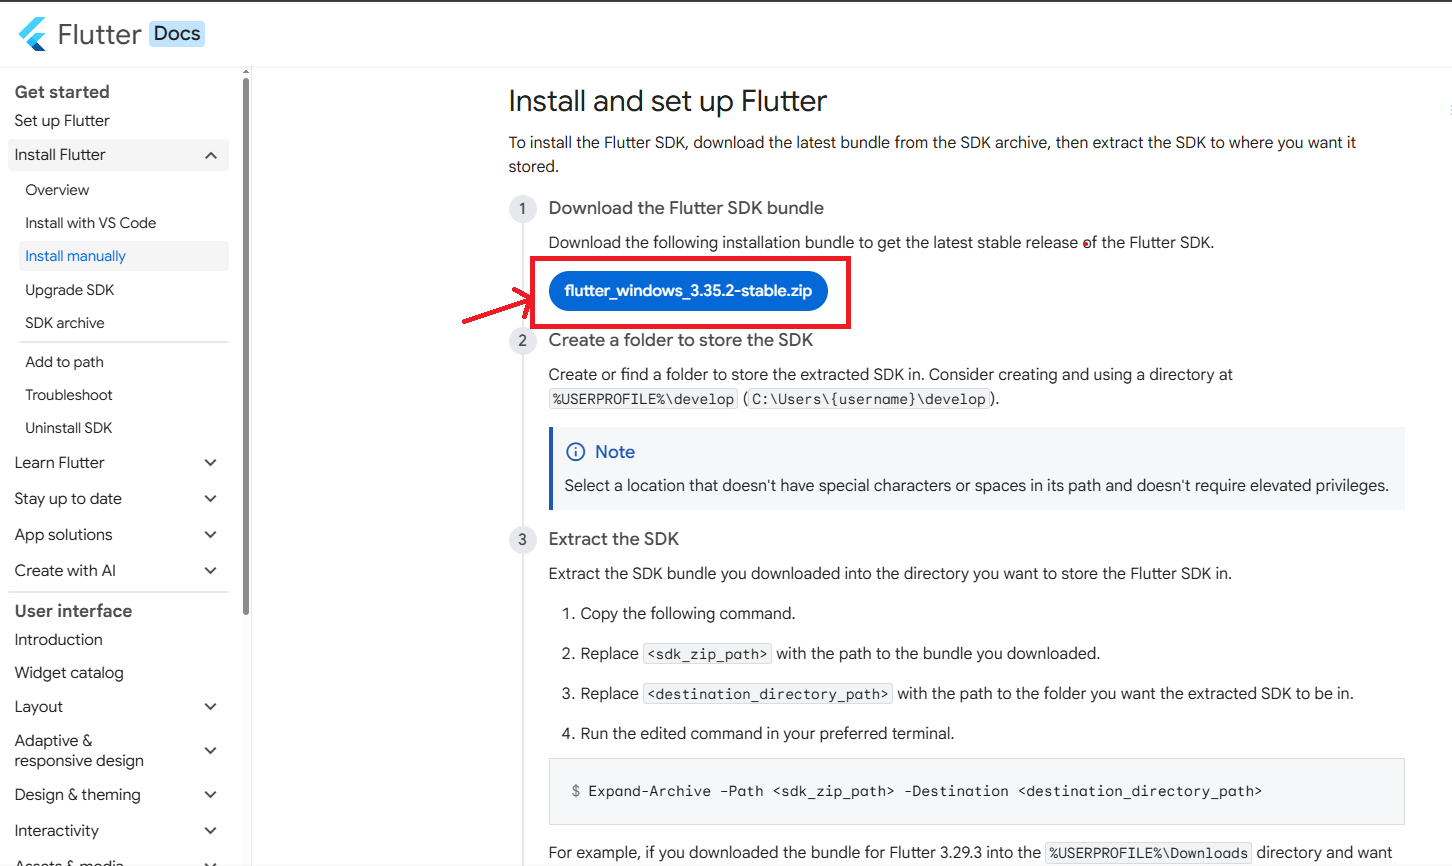
Install flutter on Windows-
- Download Android Studio- Click here
- Get the Flutter SDK- Click here
1. Download flutter sdk and Extract the zip file and copy flutter folder into your desired installation location for the Flutter SDK (eg. C:\src\flutter; do not install Flutter in a directory like C:\Program Files\).
2. Now set your enviournment variable
3. From the Start search bar in , type ‘env’ and select Edit environment variables for your account
4. Under User variables check if there is an entry called Path:
5. Click on Edit. New Dialog open from it click on new and copy full path to flutter\bin as its value
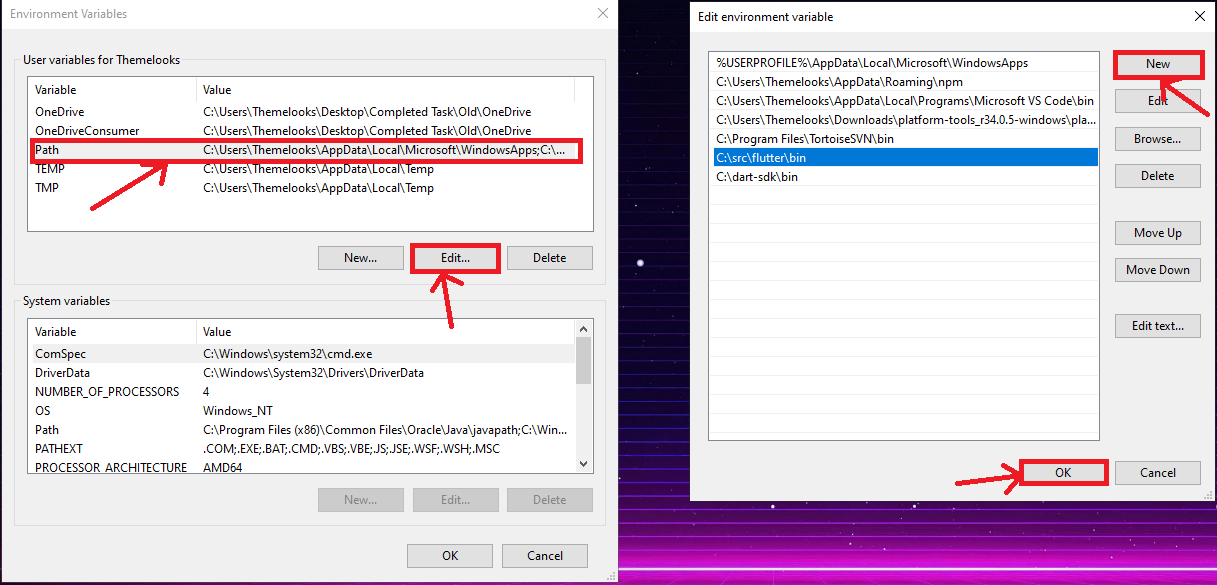
6. Now Restart your pc for changes to take effect
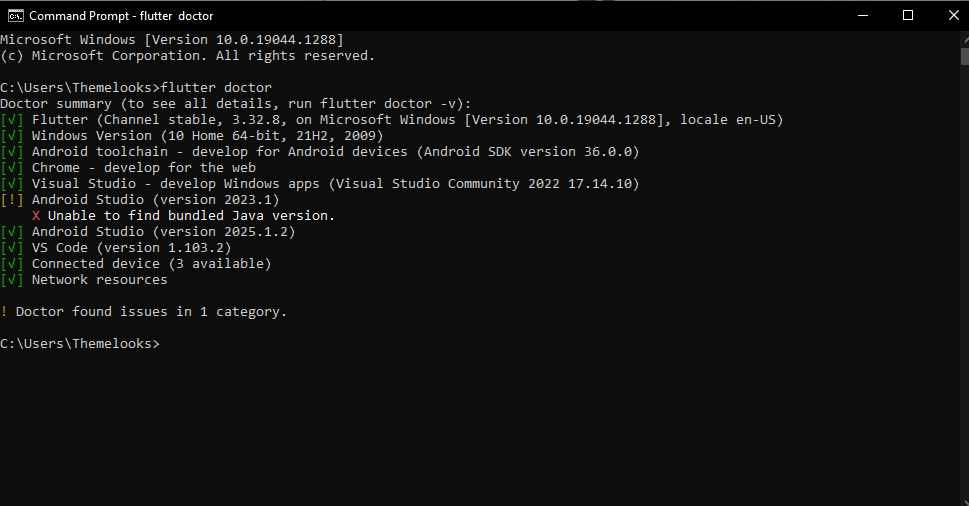
7. Now check everything is ok or not
8. Open cmd and run flutter doctor as shown the below picture
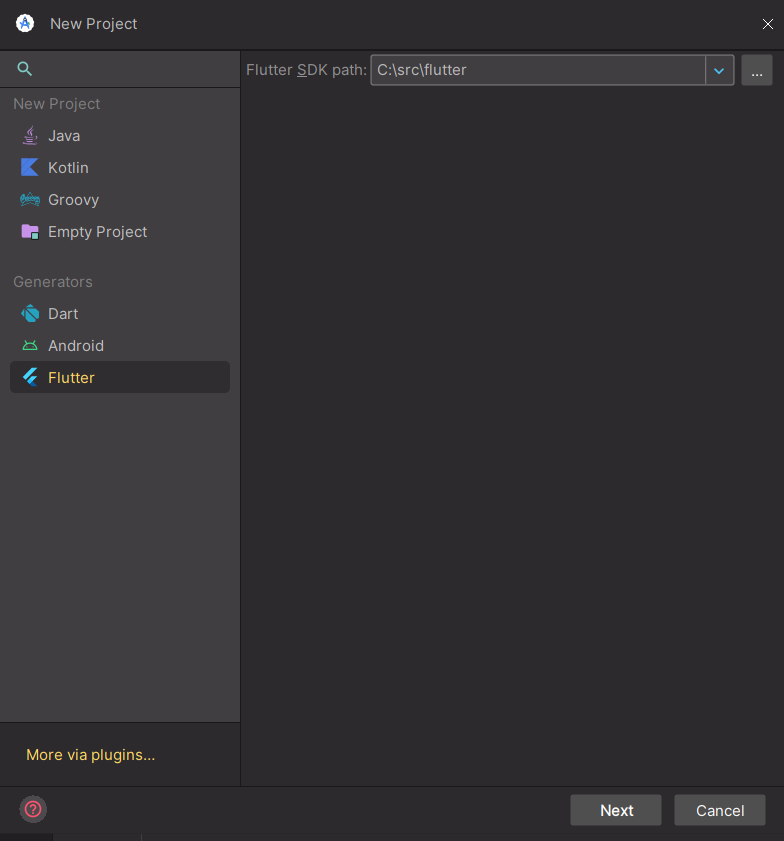
9. Now open Android Studio and create new flutter project then select your flutter sdk file to the location where we have downloaded earlier and that's it
Install flutter on Mac-
- Download Android Studio- Click here
- Get the Flutter SDK- Click here
1. Download Extract downloaded file, just double click on that. and just copy extracted folder and paste it to your desired location (for example, Documents\flutter).
2. Update your path- Path variable needs to be updated to access “flutter” command from terminal. you can just update path variable for current terminal window only. and if you want to access flutter commands from anywhere in terminal, we need to update SDK path permanently.
To update PATH variable, we need to open terminal.
To update PATH variable for current terminal window only, then enter this command "export PATH="$PATH:`pwd`/flutter/bin"" and hit enter key.
To update PATH variable permanently, then Open or create. "bash_profile" file. to open or create that file, then enter "sudo open -e $HOME/.bash_profile"and hit enter key.
Append below line to bash_profile file at bottom of all other content. "export PATH="$PATH:[PATH_TO_FLUTTER_GIT_DIRECTORY]/flutter/bin"" as [PATH_TO_FLUTTER_GIT_DIRECTORY] is actual path of SDK folder.
Run this command on terminal "source $HOME/.bash_profile" to refresh PATH variables.
Then check whether our SDK is successfully installed or not.
You are now ready to run Flutter commands in the Flutter Console!
Run "flutter doctor" into terminal, If you are getting check list of flutter sdk requirements, it means SDK is successfully installed on your machine. and you can start building flutter apps on your machine.
If you find any issue during environment setup in macos, please go online- Click here
Install flutter on Linux-
- Download Android Studio- Click here
- Get the Flutter SDK- Click here
1. Extract downloaded file, just double click on that. and just copy extracted folder and paste it to your desired location (for example, Documents\flutter).
2. Update your path- Path variable needs to be updated to access “flutter” command from terminal. you can just update path variable for current terminal window only. and if you want to access flutter commands from anywhere in terminal, we need to update SDK path permanently.
You’ll probably want to update this variable permanently, so you can run flutter commands in any terminal session. To update PATH variable, we need to open terminal.

1. Run source $HOME/. to refresh the current window, or open a new terminal window to automatically source the file.
2. Verify that the flutter/bin directory is now in your PATH by running:

Verify that the flutter command is available by running:

You are now ready to run Flutter commands in the Flutter Console!
App Configuration
Installation-
1. Flutter & Dart SDK:
- Ensure that you have Flutter and Dart SDK installed on your system. These are essential for Flutter app development.
- Install Flutter SDK- Click here
- Set up Environment for Flutter
2. Choose an IDE:
- You can use any IDE such as Android Studio, Visual Studio Code, or IntelliJ IDEA for Flutter development.
3. Set up Your Editor:
- Configure your IDE by installing the Flutter and Dart plugins to enable Flutter development features.
- Install Flutter And Dart Plugins?
4. Git:
- Although not mandatory, having a version control system like Git is highly recommended for tracking changes in your project and collaborating with other developers if needed.
For detailed installation instructions and troubleshooting, refer to the official Flutter documentation.
Install Flutter And Dart Plugins
Android Studio
1. Open Android Studio.
2. Go to Preferences(on macOS) or Settings (on Windows/Linux).
3. Select Plugins from the left sidebar.
4. Click on the Marketplace tab.
5. Search for "Flutter" in the search bar.
6. Install the "Flutter" plugin by clicking on the green Install button.
7. Install "Dart" Plugin.
8. Restart Android Studio when prompted.
Visual Studio Code
1. Visual Studio Code
2. Go to the Extensions view by clicking on the square icon in the Sidebar.
3. Search for "Flutter" in the Extensions Marketplace.
4. Click on the "Install" button for the "Flutter" extension provided by the Flutter team.
5. Install "Dart" Plugin same way.
6. After installation, you may need to restart Visual Studio Code to enable the extension.
Change Application Name
Open android/app/src/main/AndroidManifest.xml and specify your application name.

Change Application Icon
The easiest way to set new Flutter app icons is to use the flutter_launcher_icons package. Follow the steps below.
1. Prepare the icon file
Create a 1024×1024 PNG named assets/icons/app_icon.png (it is better if the background is transparent).
If you want adaptive icons for Android, have separate foreground (app_icon_fg.png) and background (HEX color or image).
2. Add the package
In the terminal: flutter pub add --dev flutter_launcher_icons
3. Configure pubspec.yaml
pubspec.yaml, add the following image(adjust the file path to your liking):
Set your Icon path
4. Generate icon
In the terminal: dart run flutter_launcher_icons or flutter pub run flutter_launcher_icons
5. Change Package Name
Android+iOS
In the terminal: flutter pub add --dev rename and dart run rename --bundleId com.yourcompany.yourapp
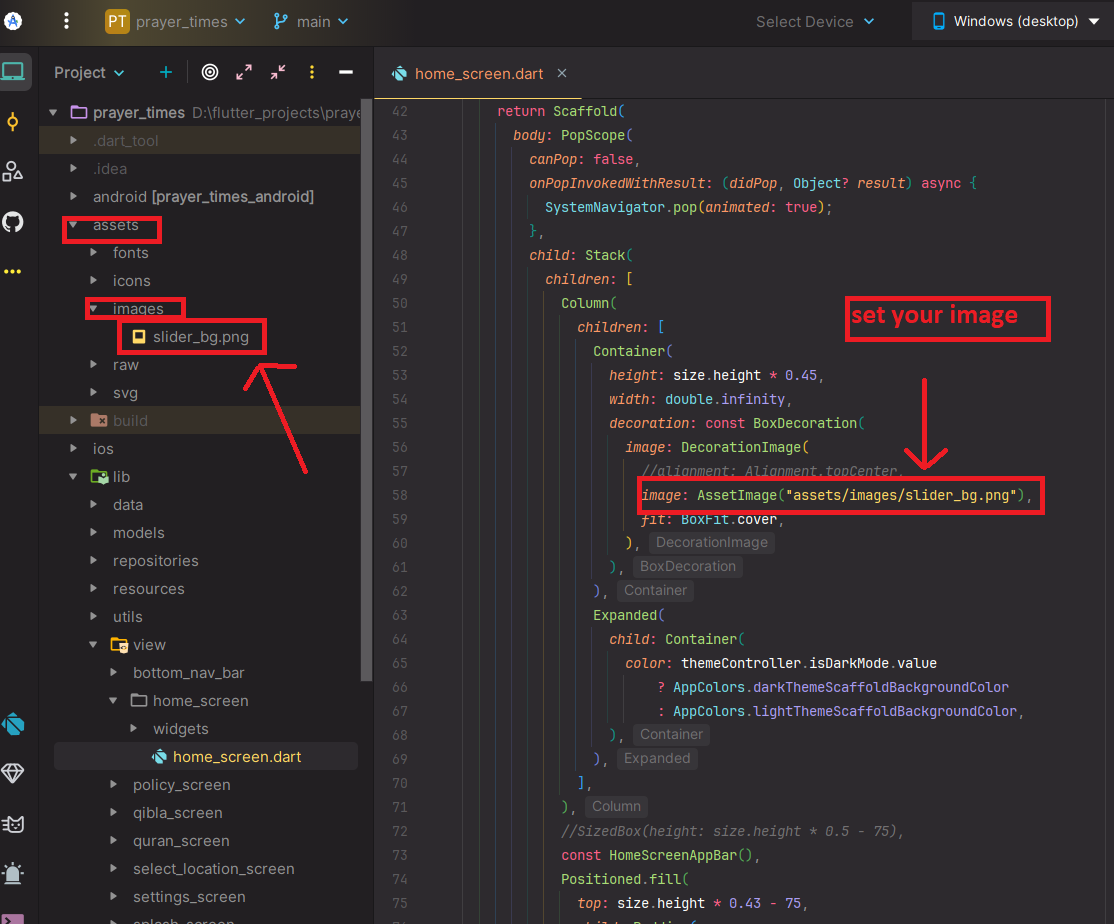
6. Change background image
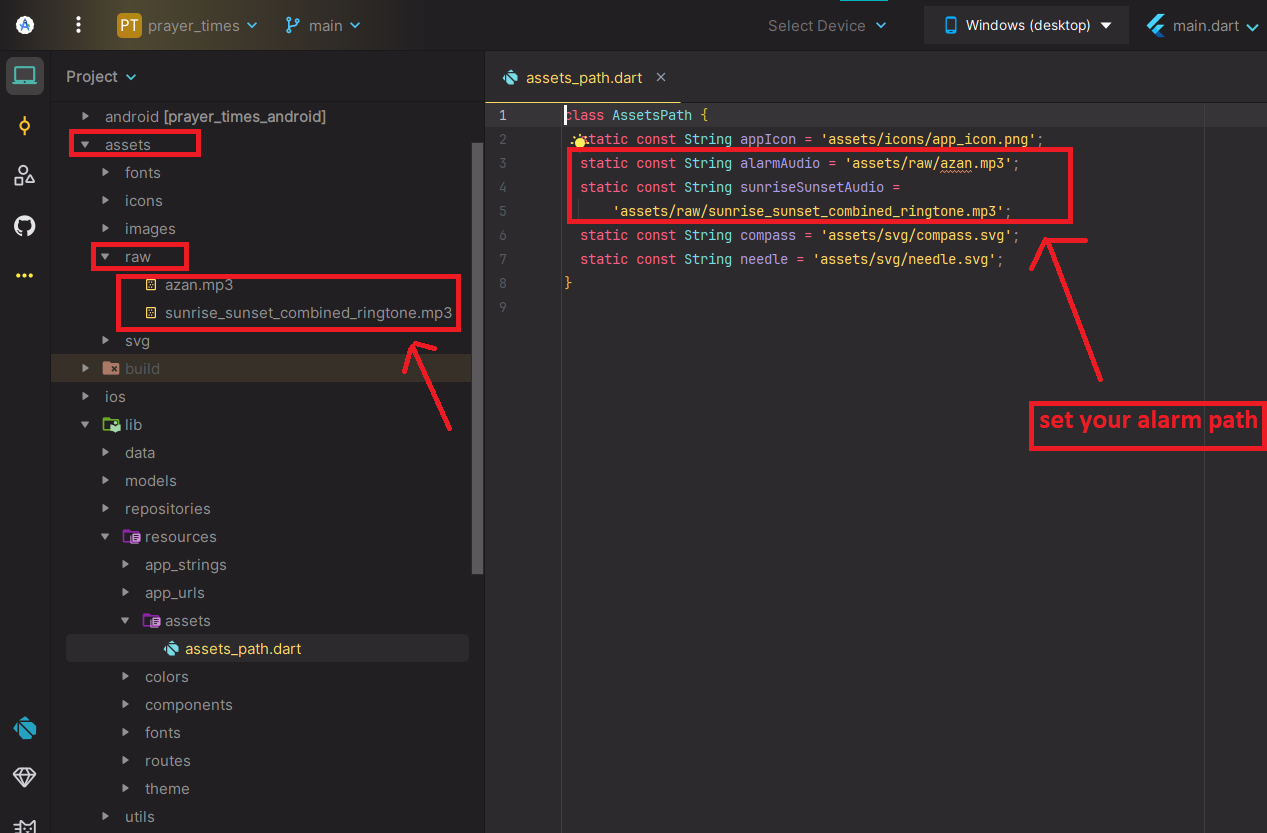
7. Change alarm notification sound
7. Change icon
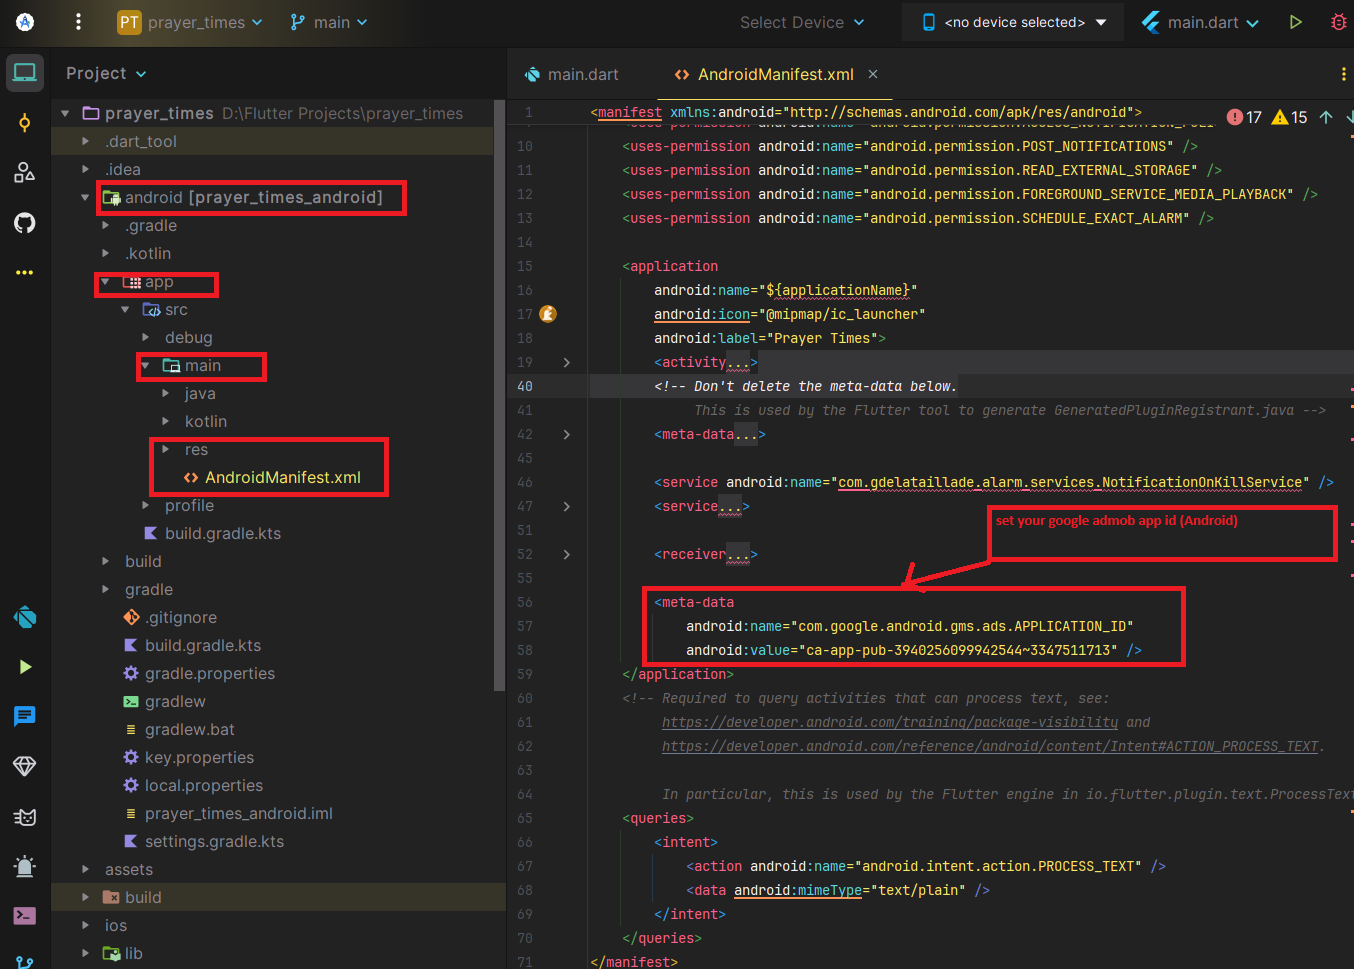
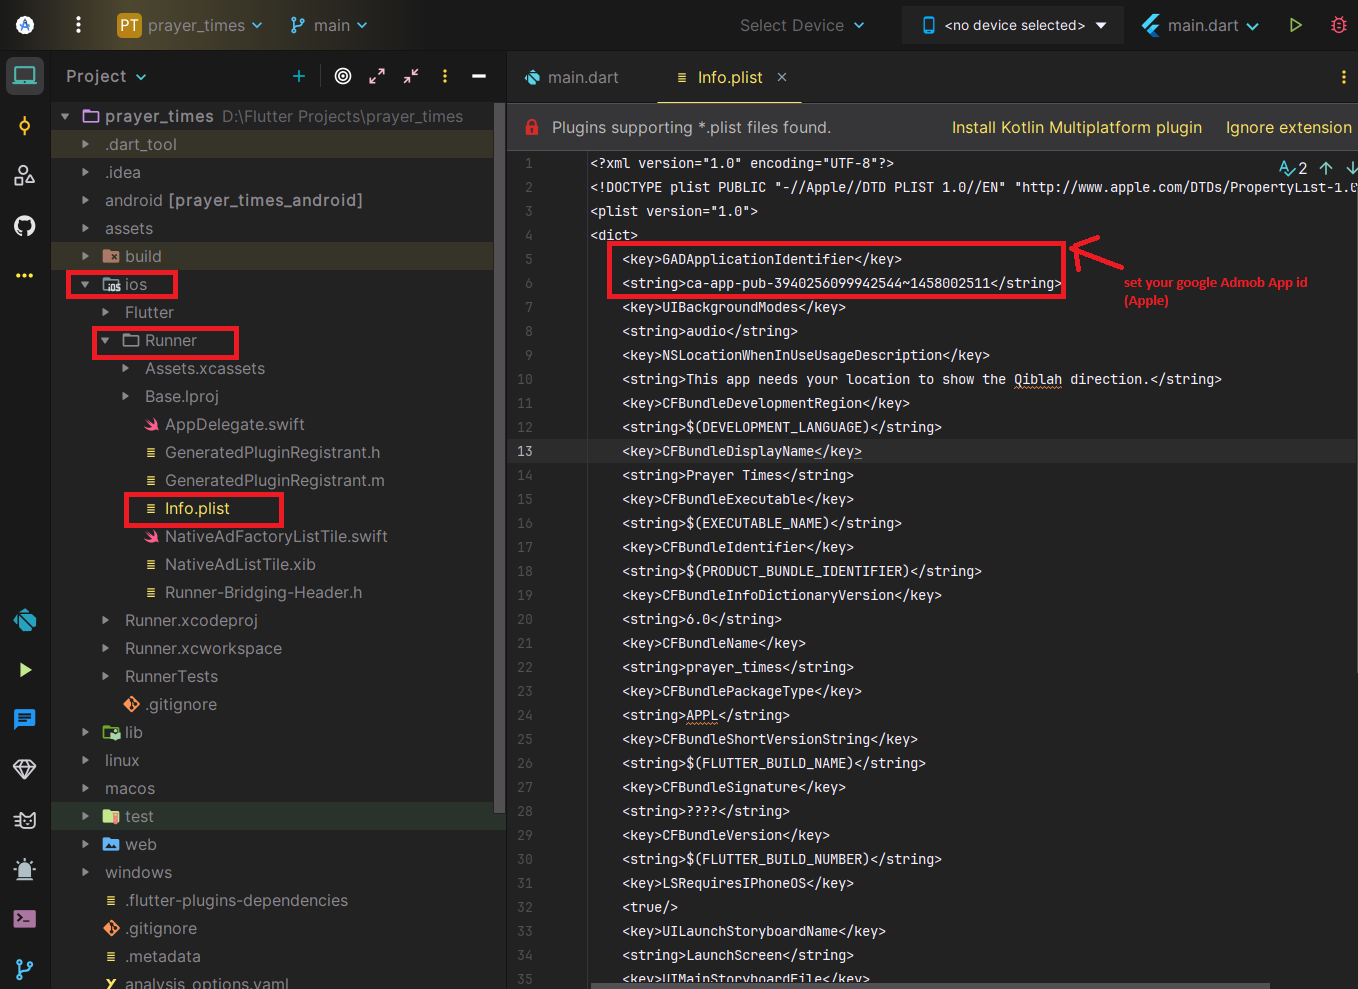
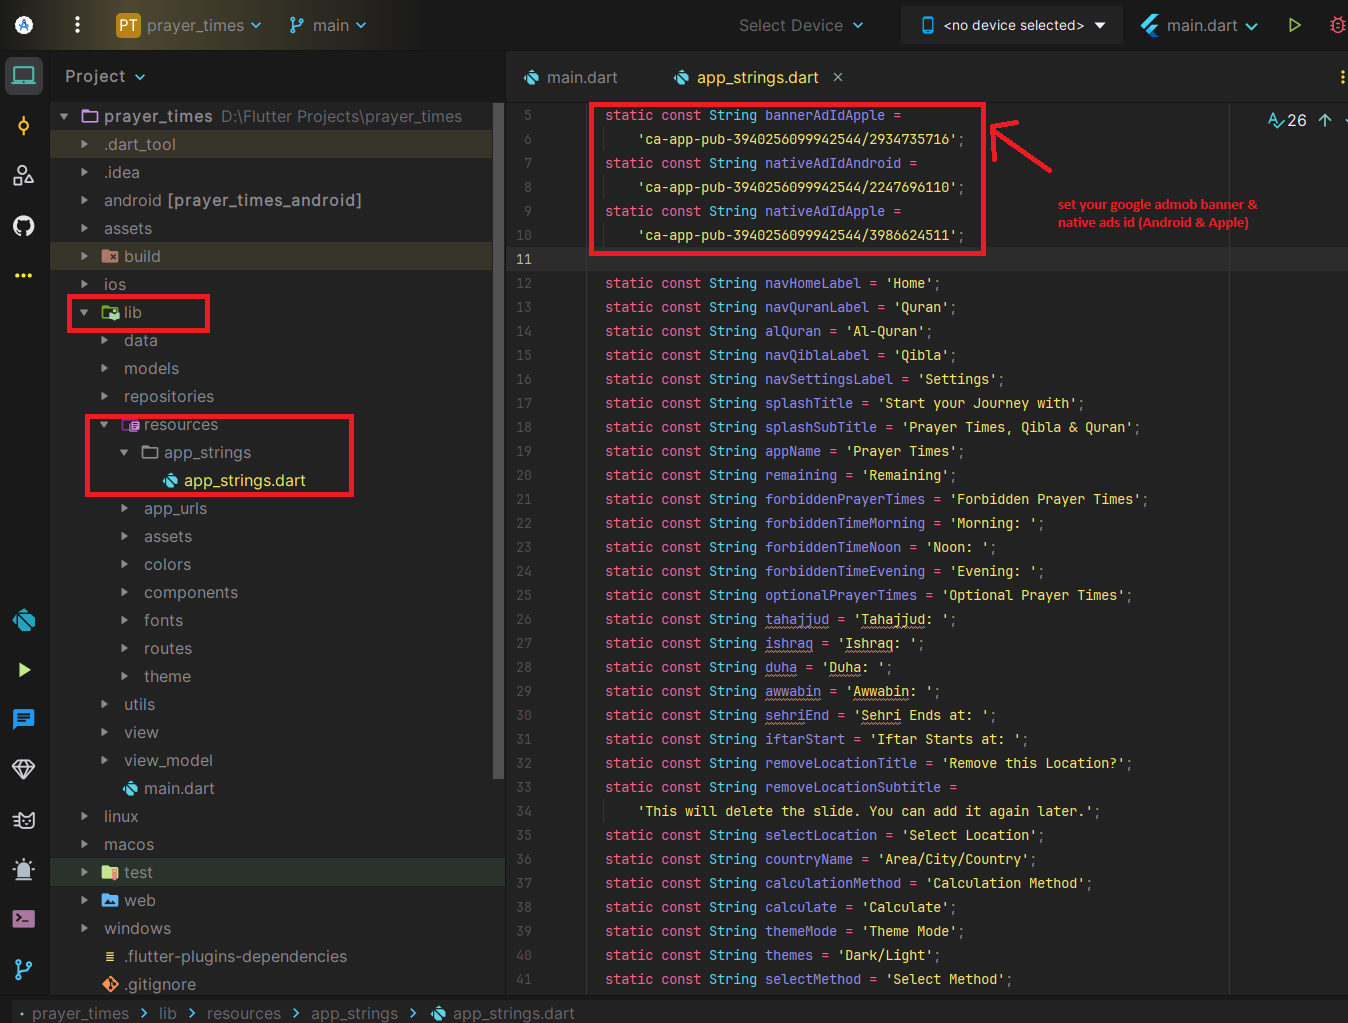
8. Set your Google Admob Ads (Android & IOS)
Change Google Admob App Id for Android
Change Google Admob App Id for Apple
Change Google Admob Banner & Native Ads ID for Android & IOS
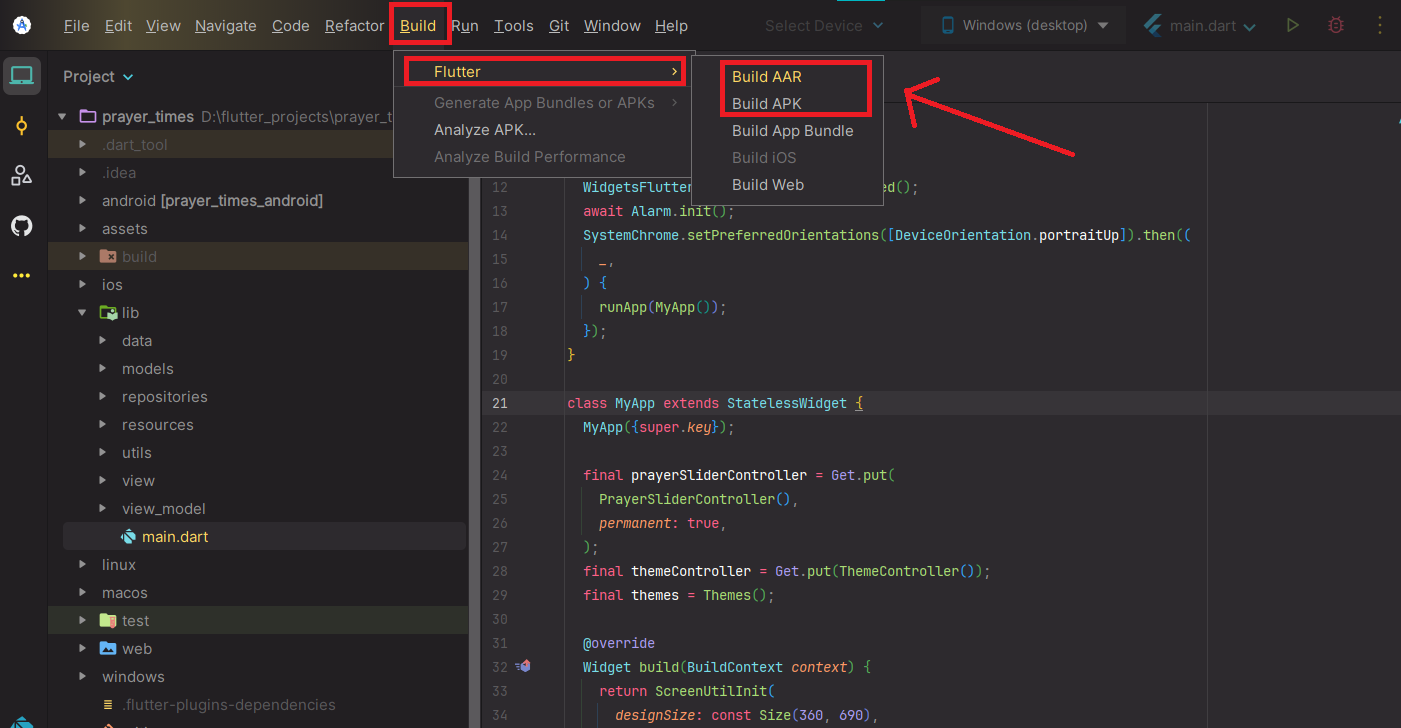
9. Generate Signed APK && AAB
Go to your project -> Build -> Flutter -> Build abb, Build apk
Build for IOS
Please follow this video
*** Must be use target sdk version (Google play store required) ***
Frequently Asked Questions
How do I update the script to a new version?
As per envato policy installation, setup and configurations or modification are not included in free support. Free support is only for any bug/ error in original code. we do not provide installation and customization support in FREE SUPPORT. Still, We are providing steps for How to update future release code to existing source code for your knowledge purpose.
Change Log
The change log provides a summary of updates made to the script. Here is an example format:
- v1.0.0 – 2025‑08‑26 – Initaial release
Consult the official change log provided by the author for a complete list of modifications.
Help & Support
For any technical questions or support requests, please contact the author via the Codecanyon support system. Include the following details to expedite assistance:
- Your purchase code (found in your Codecanyon download).
- The version of the script you are using.
- A clear description of the issue, including steps to reproduce it.
- Any relevant error messages or screenshots.
Copyright & License
This script is sold exclusively through Codecanyon and is subject to Envato’s licensing terms. You receive a regular or extended license depending on your purchase. You may use the script for a single end product, but you cannot resell or redistribute it. All trademarks and third‑party services mentioned in this documentation are the property of their respective owners.
Source and credits
- AlAdhan - Prayer Times API- Click here
- Geonames for location- Click here
- Alquarn cloud API- Click here